FIRST OF ALL I have to Post a CORRECTION. I can't believe I did this but, I mixed up my second and third cake. Aubrey's birthday comes AFTER Isaac's which means that Lightning McQueen came before the Groovy Girls. As if it really matters but... there ya go.
So, nine months after the GROOVY GIRLS came the cakes of Christmas Presents for Ellie's Second Birthday which happens to be on December 28th. By this time I was so sick of trying to find a good cake recipe that I just decided to buy the cake at the store and put the fondant on it myself. So I ordered a large sheet cake with chocolate mousse filling from Costco. I specifically ordered it frosted smooth with no piped edge or top. I believe I did tell them I was going to be adding fondant so they wouldn't think I was insane.
I then cut the cake into squares and "wrapped" them in fondant. I then added embellishments like polka dots and bows. This was the first time I had ever made a fondant bow and I do believe that is QUITE OBVIOUS. The party was at my MIL house and consequently I had to transfer all the cakes there by myself. Almost all of them made it there uneventfully except the tallest one...it completely tipped upside down. I did my best to put it back together but It did suffer a little.
My favorite part about this cake is the fondant covered candles that I made. Aren't they cute?
Monday, April 20, 2009
Thursday, April 16, 2009
Confection Chronicles: Lightning McQueen!
Going to keep posting past cakes every couple of days just to get them on here and get it over with.
My third cake was this Lightning McQueen cake that I made for my Son Isaac on his fourth birthday.
To this day it is the cake that I am most Proud of.
It has some flaws but I don't care.
I love it because I came up with the design all by myself,
while on my other cakes I use pics of other people's cakes as inspiration.
I never copy exactly but often need a boost to come up with an idea.
Check out these details...
Little Inner Tubes around the Middle layer...
Screws on the bottom layer and Tire Tread on the half tires around the bottom...
The flag on top that I measured, scored, and hand painted...
The placard that I designed to cover the giant hole in the fondant on the front of the cake.
Sometimes mistakes like that really force you to get creative. It's not always a bad thing.
So you can see all the horribly unsmooth fondant on this cake and the many other flaws it has, but all in all I love it! I really hope I get to make it again now that smooth fondant is a cinch.
I just have to wait until someone asks.
Monday, April 13, 2009
Confection Chronicles: The Groovy Girl Cake
Department of Redundancy Department Alert!
If You are my FB friend or a someone that follows my family blog, then I have probably already shown off all my past cake creations to you,
but since this is
Confections of a Sugarholic,
and by name suppose to be about MY confections...
I feel I should start by Chronicling all my past cake crash courses just for good measure.
So Here it Goes!
Since I already featured my First Fondant Cake in my Opening Post, I am starting with my 2nd,
which was
this Groovy Girl Cake I made for my second born daughter Aubrey on her eighth Birthday.
It was really fun, but I remember having so many problems with the fondant.
This is the cake that made me abandon the much suggested method of using corn starch to prevent the fondant from sticking. I found that the cornstarch would not come off the cake once it was finished and sometimes made small clumps that could only be removed with a brush and water. When you add water to fondant it changes the color. You can see on this pic that there are spots of darker purple on the front and even small specks of cornstarch. I'm sure there is a secret to the cornstarch method but I wasn't willing to try it out enough times to get it right. Instead I just started to use shortening and I have never looked back. It works great and never messes up the finished look of your fondant!
In case you just got totally bored with that last paragraph, here's the sum of it...
DON'T USE CORNSTARCH TO PREVENT YOUR FONDANT FROM STICKING, USE CRISCO!
Other things I learned from this project:
measure out designs before they are applied. A ruler has become a cake decorating necessity for me.
Don't use as much food coloring as you thing you need. The color deepens with time especially on darker colors like the purple on this cake. I suppose the colors aren't so off that it really mattered, But... I could sit any pick it apart forever. At the time I was VERY proud of it (I still am to a lesser degree). What I am still happy about is how much Aubrey and all her Birthday Party guests loved it.
So the supply run down on this is:
3 frosted cakes
10 inch
8 inch
& 6 inch
2 batches Marshmallow Fondant (MM)
3 plastic Groovy Girl Figurines
Silver floral wire
Wilton Flower Fondant Cutter Set
Wilton Circle Fondant Cutter Set
the end of a frosting tip for the 1/4" circles
Friday, April 10, 2009
On an Egg Roll!
So I haven't tried them yet but
On the Top of my Project list,
now that I have no Birthday cakes to make:(,
are CAKE POPS!!!
What the Hay are Cake Pops, you say? (If you know humor me)
Why, its a cake ball on a stick!
What's a cake ball?
I know, I said the same thing when my sister Jena mentioned them to me.
Basically some oh-so-cleverer-than-me girl
(I'm just going to go out on a sexist limb on that one)
figured out how to use her cake scraps by mixing them
with frosting in a bowl and squishing them into balls
and THEN...
(I love this Part)
Covering them with Chocolate.
They look like truffles... only they are cake and frosting all in one bite...
SOUNDS YUMMY HUH?
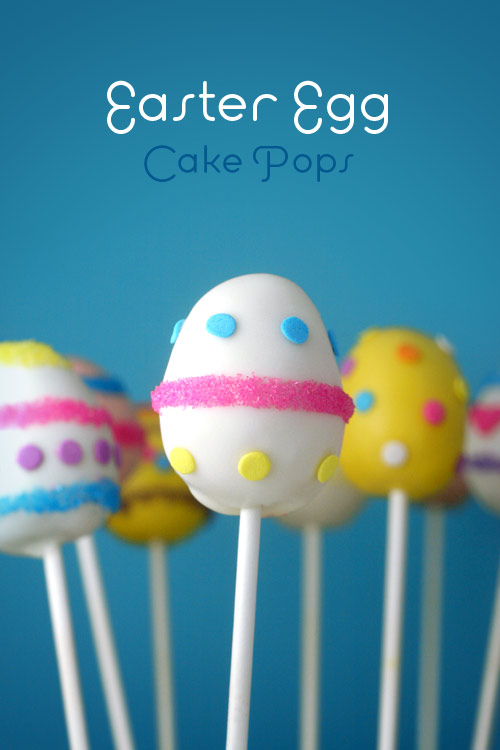
Any Who, I found these
EASTER EGG
Cake Pops
that I am totally going to make
So Cute !!!!
Oh and they have Bunnies and Chicks and Lambs, too.
click here for directions if you are ambitious enough to make them Yourself...
Basic Cake Pops
and then go here to make them all Eastery Cute...
Easter Cake Pops
I'm going to, Even if it is after easter because check out these...
I have a feeling I may be in need of some online supply ordering...
Please let me know if you try them.
I'll keep you posted on my impending mess and results!
On the Top of my Project list,
now that I have no Birthday cakes to make:(,
are CAKE POPS!!!
What the Hay are Cake Pops, you say? (If you know humor me)
Why, its a cake ball on a stick!
What's a cake ball?
I know, I said the same thing when my sister Jena mentioned them to me.
Basically some oh-so-cleverer-than-me girl
(I'm just going to go out on a sexist limb on that one)
figured out how to use her cake scraps by mixing them
with frosting in a bowl and squishing them into balls
and THEN...
(I love this Part)
Covering them with Chocolate.
They look like truffles... only they are cake and frosting all in one bite...
SOUNDS YUMMY HUH?
Any Who, I found these
Adorabley
Cute EASTER EGG
Cake Pops
that I am totally going to make
So Cute !!!!
Oh and they have Bunnies and Chicks and Lambs, too.
click here for directions if you are ambitious enough to make them Yourself...
Basic Cake Pops
and then go here to make them all Eastery Cute...
Easter Cake Pops
I'm going to, Even if it is after easter because check out these...
I have a feeling I may be in need of some online supply ordering...
Please let me know if you try them.
I'll keep you posted on my impending mess and results!
Find Number One... Tie Dyed Easter Eggs!
Okay, so this isn't sugar. But can you be more sugar related than
EASTER ???
These are THE COOLESTEaster Eggs I've ever Seen!
I Probably won't be making any
because of the constraints of time
Easter is only 2 days away!
But hey I just Had to mention them. Oh and probably the people that made them:
http://www.ourbestbites.com/
And Looking at these gets my wheels turning...
If this works on eggs, could it possibly work on GUMPASTE..?
Hmmmmm...
Check it out and let me know what you think...
tHis BloWs mY mInD!
Silk-Dyed Eggs.
Here's the quick run-down:
You need 100% silk for this to work. Make sure to check the labels to make sure you're not buying polyester, which can look similar. I grab old ties at the thrift store where they're all under a buck. And remember: when it comes to ties, you may not want ugly ones on your man, but ugly ties do make pretty eggs! You could also use silk from an old blouse, a scarf, whatever.
I try to find an assortment of colors and patterns. Usually dark blues, purples, and reds work the best, but it's fun to experiment with all kinds of things. The interesting thing is that you never know how much of the color and pattern will transfer to the eggs. Sometimes ties I think will be awesome really disappoint, and ones I didn't think much of make the most beautiful eggs. Here's the ties I picked up this year:
Usually it will tell you if it's 100% silk right on the main label of the tie, but a lot of them don't, and if that's the case, check that little tiny end, it's usually hiding there.
The first step is to deconstruct the tie. Snip the seams and remove the lining so you are just left with the silk.
Next you cut a piece large enough to cover an egg. Wrap the egg with the right side of the fabric making contact with the egg. The right side is the printed side, or the side that would be on the outside of the tie. You want to try to wrap the fabric as tight as you can without breaking the egg of course. The more direct contact the silk has with the egg shell the clearer the imprint of the pattern. Where there are folds in the fabric you'll get kind of a swirly water color effect. I love those parts- it adds to the charm. Once wrapped, tie with a piece of string or a twisty tie. (Do yourself a favor and go with the twisty tie!)
A little thought: You're going to use the largest part of the tie, at the bottom, and be left with the rest of it which might not be large enough to use again. What I do is take all of those pieces and just stitch them together on my sewing machine. It's really fast and then I'm left with a brand new piece of silk to cut squares from. You can get a lot more use out of them that way and it's fun to combine fabrics. Also, you can use a piece of silk more than once, but it loses a large amount of it's potency after the first dye, so I always just toss the used pieces.
Looking at the picture below makes me happy. It just does. How cute are those little guys? They have no idea what's comin'...
After the eggs are wrapped, you're going to wrap them again with a light colored light weight piece of fabric. An old pillowcase or sheet is perfect. If you go to the thrift store to get ties, you may want to grab a pillowcase too. Otherwise you might get impatient at home and just take one from your kid's room. Don't tell my husband I did that.
Put all those little guys in a pot and cover them with water. Add 1/4 C vinegar and bring it to a boil. After about 20 minutes you can remove the eggs and set them in a colander or on a towel to dry and cool. Once they're cool enough to handle you can remove the fabric.
This is my favorite part. I get so antsy waiting for them to cool. It's always a surprise to see what went on in that little package. Below are some of my results. I have to say that the first one is probably my favorite egg of all the ones I've ever done. I can't believe how clearly those flowers transferred and how bold the colors turned out. Incredible!
I absolutely love the cool stripy, swirly thing going on in this one
This is one of the disappointments I talked about. I was so excited for a green tie and I thought the pattern was cool (ya know, for an egg) but it turned out super light and muted. Still pretty though, kind of like water colors.
I almost didn't buy this blue tie because it looked boring, but I'm glad I did. Remember: bad ties make good eggs!
So that's that. Try this out and let me know how it goes. Everyone will wonder how on earth you did it! Just tell them you're a genius.
And if you do try it out, make sure to take some pictures and put them on our facebook page so we can all admire them!
Safety Note: A few people have asked about the dye transferring to the actual egg. Know that it is not food safe dye. Who knows where the silk came from our how it was colored. That being said, I have indeed eaten the eggs in years past and I'm still here, but to be on the safe you probably shouldn't.
For full, printable directions: Click here.
Thursday, April 9, 2009
Have My Cake and Blog About It Too!
So it has been 2 years since I decided to venture out on an artistic limb and make my first fondant cake. This took me
Not Bad for a first try but
boy have I learned a lot since then.
Needless to say I wasn't scared off by the feat.
I have since become
OBSESSED
with all things cake...
and cupcake...
and frosting...
and filling...
and cookie...
(Cue Dramatic Music)
Yes, My name is Amanda Moss and I'm a
SUGARHOLIC!!!
And not because I want to eat sugar ( I do really like that part as well)
but because
I am on a mission to unlock the sugar potential in every bag of C&H that inhabits my pantry.
I want to Mold sugar, Sculpt sugar, Melt sugar, Beat sugar, Whip sugar, Bake sugar...
All I can do to help
sugar be at it's BEST...
AND
In my Opinion sugar at it's VERY best takes on one form...
Cake!!!
But this blog will not only be about me and my attempts to make cake but all the many wonderful things I come across that feed my addiction and keep me wanting more...ideas, tools, supplies, recipes...ect.
This is going to be SWEET!
3 days to finish
Not Bad for a first try but
boy have I learned a lot since then.
Needless to say I wasn't scared off by the feat.
I have since become
OBSESSED
with all things cake...
and cupcake...
and frosting...
and filling...
and cookie...
(Cue Dramatic Music)
Yes, My name is Amanda Moss and I'm a
SUGARHOLIC!!!
And not because I want to eat sugar ( I do really like that part as well)
but because
I am on a mission to unlock the sugar potential in every bag of C&H that inhabits my pantry.
I want to Mold sugar, Sculpt sugar, Melt sugar, Beat sugar, Whip sugar, Bake sugar...
All I can do to help
sugar be at it's BEST...
AND
In my Opinion sugar at it's VERY best takes on one form...
Cake!!!
But this blog will not only be about me and my attempts to make cake but all the many wonderful things I come across that feed my addiction and keep me wanting more...ideas, tools, supplies, recipes...ect.
This is going to be SWEET!
Subscribe to:
Posts (Atom)